Lab 1: Introduction to JavaScript#
This lab is designed as an introduction to, or revision of, JavaScript, the programming language that underpins most modern web-based applications and is widely used in interactive graphics, including WebGL. The aim of this session is to ensure that all students have a solid working foundation in JavaScript before it is used in more advanced contexts later in the module.
JavaScript is a general-purpose, event-driven programming language that runs in the browser. Unlike languages such as C++ or Java, JavaScript is dynamically typed and tightly integrated with the web environment. It is commonly used to respond to user input, manipulate the content of a webpage, and control interactive behaviour in real time.
Using these notes#
These notes follow a code-along approach. As you work through them, you will be asked to create files, enter text, and run code at each stage. Working in this way is intended to help you build a practical understanding of the concepts and techniques used in computer graphics.
Where you are asked to enter code into your files, you are strongly encouraged to type the code yourself rather than copying and pasting. Although this may lead to occasional typographical errors or bugs, the process of writing the code line by line helps reinforce how the code works and what each part is doing. Making and fixing mistakes is a normal and valuable part of learning to program, and will help deepen your understanding of the material.
Task
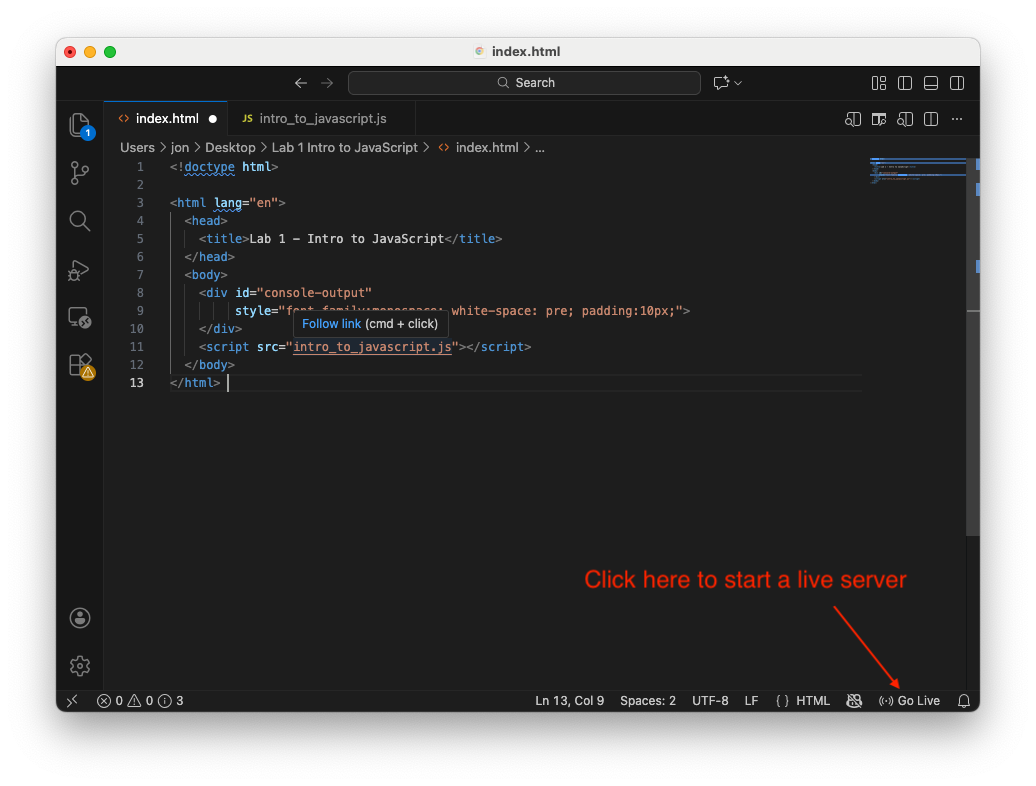
Create a folder called Lab 1 Intro to JavaScript then open your folder in Visual Studio Code by clicking on File > Open Folder…. Create a new file by clicking on File > New File… (or press ctrl + N on Windows or ⌘ + N on MacOS) and enter the following code.
<!doctype html>

<html lang="en">
    <head>
        <title>Lab 1 - Intro to JavaScript</title>
    </head>
    <body>
        <div id="console-output"
                 style="font-family:monospace; white-space: pre; padding:10px;">
        </div>
        <script src="intro_to_javascript.js"></script>
    </body>
</html>
Save the file using File > Save (ctrl + S on Windows or Linux or ⌘ + S on MacOS), give it the filename index.html and save it to your Lab 1 Intro to JavaScript folder.
Create another file called intro_to_javascript.js and enter the following code into it.
function setupConsoleOutput(elementId) {
    const output = document.getElementById(elementId);

    function write(args) {
        const line = document.createElement("div");
        line.textContent = [...args].join(" ");
        output.appendChild(line);
    }
    console.log = (...args) => write(args);
}

setupConsoleOutput("console-output");
console.log("Lab 1 - Intro to JavaScript\n---------------------------");
Select the index.html file and launcha live server by clicking on “Go Live” in the bottom right-hand corner of the window.
Here we have created a basic HTML file along with a JavaScript file in which have defined the function setupConsoleOutput(). This means that any call to console.log() will output to the HTML page (console.log() is a debugging tool that prints information to the browser’s developer console). If everything has gone to plan you should see a plain web page with the following.
Lab 1 - Intro to JavaScript
---------------------------
Important
If you don’t have the Live Server extension installed in Visual Studio Code follow these steps
Click the Extensions icon in the left sidebar (or press ctrl + shift + X on Windows or Linux, or ⌘ + shift + X on macOS)
Search for “Live server”
Install Live Server by Ritwick Dey
Once installed, Visual Studio Code may prompt you to reload.
Note
The live server will automatically refresh the webpage whenever a file in the project is saved.
Variables#
A variable is a named reference to a value stored in memory. Variables allow programs to store data, reuse it and change it over time. In JavaScript variables are used to store
Numbers
Text (strings)
Boolean values (
true/false)Objects, arrays and functions.
Variables are declared using the following keywords
let– used for variables whose values may changeconst– used for variables whose values should not be reassigned
Task
Enter the following into the intro_to_javascript.js file.
// Variables
console.log("\nVariables\n---------")
let score;
score = 10;
console.log("score: " + score);
score += 20;
console.log("score: " + score);
Here we have declared the variable score and in the following line set its value equal to 10 and then printed it along with a string in the same console.log() command. Note that the semicolons ; at the end of each line are not a strict requirement, but it is good programming practice as it makes it clear where the statement ends.
Save the file, and you should notice that this have the effect of refreshing the web browser, and you should see the following added to the web page.
Variables
---------
score: 10
score: 30
Note
Any code following a double forward slash // is a comment and is ignored by the web browser or JavaScript engine. Comments are useful to let someone (or yourself) know what or why a particular bit of code is being used.
Longer multi-line comments can be entered using /* ... */
/*
    This is a
    multi-line comment
*/
Task
Add the following to your JavaScript file.
const lives = 3;
lives = 1;
console.log("lives: " + lives);
Refresh the web browser, and you should see that nothing has changed despite adding a call to console.log(). Open the browser’s developer console (if you are using Chrome or Edge then press CTRL + SHIFT + J or ⌥ + ⌘ + J for Chrome on a Mac) and it should give you an indication of what has gone wrong. Here it should say something like the following
Error
Uncaught TypeError: Assignment to constant variable. at intro_to_javascript.js:24:7
Here the error message is telling us we have an error in the intro_to_javascript.js on line 24 (this may vary depending on your code). The error we have here is we have declared lives using the const keyword, set it equal to 3 and then try to reasssign it to 1. To resolve this error simply change the const to let and refresh your browser, and you should see the following added to the web page.
lives: 2
Note
So if declaring a variable using let allows you to change its value why do we need const? Many variables are assigned once and never reassigned, so using const prevents bugs caused by accidental reassignment and also communicates intent to someone reading the code. In practice, always use const unless you know for certain the you will be reassigning the variable later.
Variable names#
Variable names must:
Start with a letter,
_or$Not start with a number
Not use reserved keywords
It is good practice to use descriptive variable names, for example
let x = 10;
let y = 5;
let z = z * y;
does not give any context to someone reading the code whereas
let width = 10;
let height = 5;
let area = width * height;
does. Where variable names are a concatenation of two or more words it is common practice to use camelCase where the first word starts with a lowercase letter and all subsequent words start with an uppercase letter, for example
let playerScore;
let framesPerSecond;
The uppercase letters create the appearance of a camel’s humps, hence the name (bit of a stretch in my opinion).
Data types#
JavaScript has 8 core data types
Type |
Description |
|---|---|
number |
Integer numbers (whole numbers) and floating-point numbers (decimals) |
string |
Sequence of letters |
boolean |
|
undefined |
A variable that has been declared but not assigned a value |
null |
Intentional absence of a value |
symbol |
Used to represent a unique identifier (used mainly in advanced code) |
bigint |
Integers larger than those that can be represented exactly |
object |
Used for collections of data and more complex structures (e.g., arrays, functions) |
We can check data type using the typeof operator. JavaScript is a dynamically typed programming language which means we do not need to declare a variable’s data type, the type comes from the value already stored.
Task
Add the following to your JavaScript file.
let myVariable;
console.log(`\nThe assigned value of myVariable is ${myVariable}
The data type of myVariable is ${typeof(myVariable)}`);

myVariable = 10;
console.log(`\nThe assigned value of myVariable is ${myVariable}
The data type of myVariable is ${typeof(myVariable)}`);

myVariable = "level one";
console.log(`\nThe assigned value of myVariable is ${myVariable}
The data type of myVariable is ${typeof(myVariable)}`);
Here we have declared the variable myVariable and left it unassigned and then outputted its value and type. We then reassign the variable to a number and a string. Note that here we have used backticks ` ` instead of double quotes " " for the string in the console.log() command. This is a template literal that allow us to output values using ${myVariable} and also use multiline strings.
Refresh your browser, and you should see the following on your web page.
The assigned value of myVariable is undefined
The data type of myVariable is undefined

The assigned value of myVariable is 10
The data type of myVariable is number

The assigned value of myVariable is level one
The data type of myVariable is string
Arithmetic operators#
Arithmetic operators are used to perform mathematical calculations on numbers. The arithmetic operators in JavaScript are similar to those used in other languages.
Operator |
Description |
Example |
Result |
|---|---|---|---|
|
Addition |
|
|
|
Subtraction |
|
|
|
Multiplication |
|
|
|
Division |
|
|
|
Modulus (remainder) |
|
|
There are also shorthand versions for common operations.
Operator |
Description |
Example |
Equivalent |
|---|---|---|---|
|
Add to |
|
|
|
Subtract from |
|
|
|
Multiply by |
|
|
|
Divide by |
|
|
|
Increment by 1 |
|
|
|
Decrement by 1 |
|
|
The Math library#
JavaScript provides a built-in object called Math that contains properties and functions for common mathematical operations. All methods and constants from the Math library are accessed using the Math. prefix, for example
const x = Math.sqrt(2);
Some useful methods from the Math library are
Method |
Description |
Example |
Result |
|---|---|---|---|
|
Square root |
|
|
|
Cosine |
|
|
|
Sine |
|
|
|
Absolute value (ignore sign) |
|
|
|
Power |
|
|
|
Round to nearest integer |
|
|
|
Round down |
|
|
|
Minimum value |
|
|
|
Maximum value |
|
|
|
Random number between 0 and 1 |
|
|
The Math library also provides several useful mathematical constants and read-only properties (they cannot be reassigned)
Constant |
Description |
|---|---|
|
\(\pi = 3.1416\) |
|
Eulers number \(e = 2.7183\) |
|
\(\sqrt{2} = 1.4142\) |
|
\(\sqrt{2}/2 = 0.7071\) |
|
\(\log_e(2) = 0.6931\) |
|
\(\log_e(10) = 2.3026\) |
An example of the use of Math library constants that is used a lot in computer graphics is the conversion of an angle from degrees to radians which is
For example, to convert \(90^\circ\) to radians we have
Most languages, including JavaScript and GLSL (the language used by WebGL to program on the GPU), assumes angles are always expressed in radians.
Task
Add the following to your JavaScript file.
// Math library
console.log("\nMath library\n------------")
const angleInDegress = 90;
const angleInRadians = angleInDegress * Math.PI / 180;
console.log(`${angleInDegress} degrees is ${angleInRadians.toFixed(4)} radians.`);
console.log(`cos(${angleInDegress} degrees) = ` + Math.cos(angleInRadians));
Here we have used the Math library constant Math.PI to convert \(90^\circ\) to radians and also shown that \(\cos(90^\circ) = 0\). The method .toFixed(4) outputs the floating point number using 4 decimal places. Refresh your browser, and you should see the following on your web page.
Math library
------------
90 degrees is 1.5708 radians.
cos(90 degrees) = 6.123233995736766e-17
Note that \(\cos(90^\circ)\) is outputted as \(6.12 \times 10^{-17}\) which is 0.0000000000000000612 showing that floating point arithmetic is never exact.
Arrays#
An array is a data structure used to store multiple values in a single variable. Arrays are fundamental in JavaScript and especially important in computer graphics and WebGL. Arrays are assigned using square brackets [ ] with commas , separating the values in an array.
Task
Add the following to your JavaScript file.
// Arrays
console.log("\nArrays\n------")

const colours = [ "red", "green", "blue" ];
console.log("colours = " + colours);
Here we have declared the variable colours which is assigned to an array containing the strings of the three primary colours. Refresh your browser, and you should see the following is added to your web page.
Arrays
------
colours = red,green,blue
Array length#
The number of values in an array can be determined using array.length.
Task
Add the following to your JavaScript file.
console.log(`\nthe colours array contains ${colours.length} values`);
Refresh your browser, and you should see the following is added to your web page.
the colours array contains 3 values
Accessing and modifying array values#
Individual values of an array are access using indexing with the syntax array[index] where the index is a number that defines the position of the value in the array starting at 0.
Task
Add the following to your JavaScript file.
colours[1] = 2;
console.log("colours = ", colours);
Here we have reassigned the second value in the colours array to the number 2. Refresh your browser, and you should see the following is added to your web page.
colours = red,2,blue
Note that even though we initially declared the colours array using the const keyword, we can change the values in the array. This is because we haven’t changed the type (object) or size of the array.
We can access multiple values of an array using array.slice(start, end).
Task
Add the following to your JavaScript file.
console.log("\nThe first two values of the array colours is: " + colours.slice(0, 2));
Refresh your browser, and you should see the following is added to your web page.
colours = red,2,blue
Appending to an array#
Additional values can be appended to the end of an array using array.push(value).
Task
Add the following to your JavaScript file.
colours.push(3.1416);
console.log("\ncolours = " + colours);
Refresh your browser, and you should see the following is added to your web page.
colours = red,2,blue,3.1416
Concatenating arrays#
We can join, or concatenate, two or more arrays together to form a new array using array1.concat(array2).
Task
Add the following to your JavaScript file.
const moreColours = ["black", "white"];
const concatenatedArray = colours.concat(moreColours);
console.log("\nconcatenatedArray = " + concatenatedArray);
Refresh your browser, and you should see the following is added to your web page.
concatenatedArray = red,2,blue,3.1416,black,white
Objects#
An object in JavaScript is like dictionary in Python or a data structure in C where a single variable can hold many variables known as properties. Objects are defined using curly braces { }, with property names and values separated with a colon : and each property is separated by a comma ,.
Task
Add the following to your JavaScript file.
// Objects
console.log("\nObjects\n-------");

const player = {
    name: "Mario",
    lives: 3,
    score: 0,
};
Here we have created the object player and given it some properties. To access object properties we can use either dot notation, e.g., objectName.propertyName or bracket notation, e.g., objectName["propertyName"].
Task
Add the following to your JavaScript file.
console.log("Name:         " + player.name);
console.log("Lives:        " + player["lives"]);
Here we print the value of two of the player object properties. Refresh your browser, and you should see the following is added to your web page.
Objects
-------
Name:         Mario
Lives:        3
Adding or updating properties#
Properties can also be added or updated by using dot or bracket notation.
Task
Add the following to your JavaScript file.
player.powerUp = "super";
player["score"] += 10;
console.log("Power up: " + player.powerUp);
console.log("Score:        " + player.score);
Here we have added the property powerUp and incremented the score property by 10. Refresh your browser, and you should see the following is added to your web page.
Power up: super
Score:        10
Arrays of objects#
Arrays are often used to store collections of objects which allows a program to manage many related entities, e.g., a list of enemies, using a single data structure.
Task
Add the following to your JavaScript file.
const enemies = [
    { name: "Goomba", hitPoints: 1},
    { name: "Koopa Troopa", hitPoints: 2 },
]
Here we have created an array containing two enemy objects.
Conditional statements#
Conditional statements allow your program to make decisions and run different code depending on whether a logical condition is true or false. The basic conditional statement is a if statement
if (condition) {
    // runs if condition is true
}
This performs code only if the condition statement is true. If you want to run code where the condition is true, and other code where the condition is false we can use a if...else statement
if (condition) {
    // runs if condition is true
} else {
    // runs if condition is false
}
For more complicated cases where you want to use multiple conditions we can use a if...else if...else statement
if (condition1) {
    // runs if condition1 is true
} else if (condition2) {
    // runs fi condition2 is true
} else {
    // runs if neither condition1 or condition2 is true
}
The condition statements used in the examples above need to have a boolean value. Any declared variable is considered true unless it has a value of false, 0, "", null, undefined or NaN (non a number). We can use the following comparison operators
Operator |
Description |
|---|---|
|
equal to |
|
not equal to |
|
greater than |
|
less than |
|
greater than or equal to |
|
less than or equal to |
Multiple comparisons can be joined using conjunctions
Conjunction |
Description |
True when |
|---|---|---|
|
AND |
all conditions are true |
|
OR |
at least one condition is true |
|
NOT |
condition is false |
Task
Add the following to your JavaScript file.
// Conditional statements
console.log("\nConditional statements\n---------------------")

// Power up state
if (player.powerUp === "fire") {
    console.log("Mario can throw fireballs");
} else if (player.powerUp === "super") {
    console.log("Mario is bigger and can break blocks.");
} else {
    console.log("Mario is small.");
}
Here we have used a if...else if...else statement to print the current power up state of the player object. Refresh your browser, and you should see the following is added to your web page.
Conditional statements
---------------------
Mario is bigger and can break blocks.
Make changes to the powerUp property to check this code works as expected.
Task
Add the following to your JavaScript file.
// Enemy interaction
const jumpedOnEnemy = true;
const enemyIndex = 0;

if (jumpedOnEnemy && enemies[enemyIndex].hitPoints === 1) {
    enemies[0].hitPoints--;
    console.log("Mario jumps on enemy and defeats it.");
} else if (jumpedOnEnemy) {
    enemies[0].hitPoints--;
    console.log("Enemy takes damage.");
} else if (player.powerUp === "fire" || player.powerUp === "super") {
    player.powerUp = null;
    console.log("Mario has lost his power ups.");
} else {
    player.lives--;
    console.log("Mario has lost a life.")
}
Here we have written a more sophisticated if...else if...else statement using conjunctions. Refresh your browser, and you should see the following is added to your web page.
Mario jumps on enemy and defeats it.
Make changes to the powerUp property and the jumpedOnEnemy and enemyIndex variables to check this code works as expected.
Loops#
Loops allow a program to repeat a block of code multiple times. They are essential when working with arrays of objects, rendering graphics and processing data.
For loops#
The most common loop is a for loop which has the basic syntax.
for (initialisation; condition; update) {
    // code to repeat
}
The three arguments in the for loop declaration are:
initialisation: runs once before the loop starts and creates and set a loop counter variablecondition: checked before each loop iteration and terminates the loop if this is trueupdate: runs at the end of each iteration and updates the loop counter.
Task
Add the following to your JavaScript file.
// Loops
console.log("\nLoops\n-----")

for (let i = 0; i < enemies.length; i++) {
    console.log(enemies[i].name);
}
Here we have created a for loop to print the names of the objects in the enemies array. A loop counter variable i is initialised to the value of 0. The for loop condition terminates the loop when the loop counter is greater than the length of the enemies array, and the loop counter is incremented by one by the update argument. Refresh your browser, and you should see the following is added to your web page.
Loops
-----
Goomba
Koopa Troopa
While loops#
A while loop is used to repeat code when the number of iterations is unknown. The basic syntax of a while loop is
while (condition) {
    // code to repeat whilst condition is true
}
Task
Add the following to your JavaScript file.
let time = 0;
const maxTime = 100;

while (time < maxTime) {
    time += 10;
    console.log("time = " + time);
}
Here we have defined two variables for the time and maximum time. Then we have written a while loop that checks if the time variable is less than the maximum time, if this is true the time is incremented by 10 and the current time is outputted. Refresh your browser, and you should see the following is added to your web page.
time = 10
time = 20
time = 30
time = 40
time = 50
time = 60
time = 70
time = 80
time = 90
time = 100
Functions#
A function is a reusable block of code that performs a specific task. Functions help organise programs, reduce repetition, and make code easier to understand and maintain. In computer graphics, functions are used for creating and updating objects, handing input and drawing scenes.
A function in JavaScript is defined using the following basic syntax
function functionName(parameters) {
    // code to be run when the function is called.
}
We declare a function using the function keyword and give it a name and optional parameters which are separated by commas.
Task
Add the following to your JavaScript file.
// Functions
console.log("\nFunctions\n---------")

function jump() {
    console.log("Mario jumps!");
}
Here we have defined a function called jump() that has no parameters and outputs a text string. Refresh your browser, and you should see the following is added to your web page.
Functions
---------
Note that the text “Mario jumps!” has not been outputted. This is because despite defining the function we haven’t called it yet.
Task
Add the following to your JavaScript file.
jump();
Refresh your browser, and you should see the following is added to your web page.
Mario jumps!
Parameters allow functions to recieve data.
Task
Add the following to your JavaScript file.
function moveRight(steps) {
    console.log(`Mario moves ${steps} steps to the right.`);
}

moveRight(5);
moveRight(10);
Here we have defined a function that has one parameter for the number of steps that Mario moves. Refresh your browser, and you should see the following is added to your web page.
Mario moves 5 steps to the right.
Mario moves 10 steps to the right.
Returning values#
Functions can return a value using the keyword return which will terminate the function at that point.
Task
Add the following to your JavaScript file.
function checkGameOver(lives) {
    if (lives <= 0) {
        return "Game Over!";
    }
    return "Continue playing.";
}

console.log(checkGameOver(player.lives));
Here we have defined a function that returns a string based on the value of the lives parameter. Refresh your browser, and you should see the following is added to your web page.
Continue playing.
Make changes to the lives property of the player object to check that the function performs as expected.
Object orientated programming#
Object Orientated Programming (OOP) is a way of designing programs by organising code around objects rather than isolated variables and functions. An object refers to a real or conceptual thing that combines data associated with the object and actions that can be performed on an object.
For example in the game Mario Kart, each racer can have the following properties
name
kart speed
current race position
power up
and may perform the following actions
accelerate
brake
update position
use power up
Classes#
A class is a blueprint for creating objects, it defines:
Properties – the data an object stores
Methods – the actions that an object can perform.
Classes allow us to create many similar objects in a consistent and organised way. Classes are defined using
class Name {
    constructor(parmeters) {
        // declaration of class/object properties
    }
}
It is common practice to start a class name with an uppercase character. The constructor is a special function inside a class that runs automatically when a new obect is created. Its purpose is to initialise the object’s properties.
Task
Add the following to your JavaScript file.
// Classes
console.log("\nClasses\n-------")

class Racer {
    constructor(name, position) {
        this.name = name;
        this.speed = 0;
        this.position = position;
        this.powerUp = null;
    }
}
Here we have defined a class called Racer along with a constructor that defines the properties of a Mario Kart raceer. Note that the values of name and position are parsed to the constructor, speed and powerUp are given default values. Note that this is a keyword that refers to the object that is currently being used.
Creating objects#
Once a class has been defined we can create objects from the class using the syntax
const objectName = new ClassName(parameters);
Task
Add the following to your JavaScript file.
const toad = new Racer("Toad", 3);

console.log("Name: " + toad.name);
console.log("Speed: " + toad.speed);
console.log("Position: " + toad["position"]);
console.log("Power up: " + toad["powerUp"]);
Here we have created a Racer object called toad, given it a name and race position and outputted the values of the object properties. Note that object properties are accessed using either dot or bracket notation. Refresh your browser, and you should see the following is added to your web page.
Classes
-------
Name: Toad
Speed: 0
Position: 3
Power up: undefined
Methods#
A method is a function that belongs to an object and are used to perform operations on the object. A method is defined in a class similarly to a function with the exception we do not need to use the function keyword. A method is called by using dot notation.
Task
Add the following to your Racer class (underneath the constructor() method and before the close brace } of the class definition)
accelerate() {
    this.speed += 5;
}
And add the following at the end of the file.
toad.accelerate();
console.log("Speed: " + toad.speed);
Here we have defined a method to accelerate the kart by adding 5 to the speed property (note that we use the this keyword to refer to the current object’s speed property). We have then called this function and outputted the current speed. Refresh your browser, and you should see the following is added to your web page.
Speed: 5
Task
Add the following to the Racer class.
addPowerUp() {
    const powerUps = [
        "Mushroom",
        "Green Shell",
        "Red Shell",
        "Banana",
        "Star"
    ]

    const index = Math.floor(Math.random() * powerUps.length);
    this.powerUp = powerUps[index];
}

print() {
    console.log("\nRacer details\n-------------")
    console.log("Name: " + this.name);
    console.log("Speed: " + this.speed);
    console.log("Position: " + this.position);
    console.log("Power up: " + this.powerUp);
}
Then, add the following to the end of the JavaScript file.
toad.addPowerUp();
toad.print();
Here we have defined two methods for assigning a randomly selected power up and printing the object properties. Refresh your browser, and you should see the following is added to your web page (of course your power up may be different).
Racer details
-------------
Name: Toad
Speed: 5
Position: 3
Power up: Banana
Exercises#
You are tasked with writing a JavaScript program to help the university store students’ details (name, ID number, course, marks etc.) and perform operations on this information. Create a class called
Studentthat stores a student’s name, ID number and degree course they are currently in.Create an object of your Student class called
elliewith the following details and output the property values.
Ellie Williams, 12345678, Computer Science
Add a method called
print()that prints the details of the student in the format shown below. Use this method to print the details of theellieobject.
Student Information
-------------------
Name:
ID:
Course:
Create an array called
studentsthat contains multipleStudentobjects with the following details.
Ellie Williams, 12345678, Computer Science
Joel Miller, 24680135, Computer Science
Arthur Morgan, 87654321, Computer Games Development
Geralt of Rivia, 13579246, Mathematics
Add a property called
marksinitialised as an empty array and add a method calledaddMarks()that accepts an array containing module marks and appends it to themarksproperty. Use this method to add the following marks and amend theprint()method so that a student marks are printed.
Ellie Williams: 65, 72, 92, 75
Joel Miller: 52, 68, 75, 62
Arthur Morgan: 38, 52, 48, 45
Geralt of Rivia: 92, 75, 68, 78
Add a method to the Student class called
calculateAverage()that calculates a student’s average mark. Amend theprint()method to output the average mark.Add a method that determines the degree classification of a student based on the criteria below. Amend the
print()method to include this.
Average mark |
Degree classification |
|---|---|
70 – 100 |
First class |
60 – 69 |
Upper-second class |
50 – 59 |
Lower-second class |
40 – 49 |
Third class |
0 – 40 |
Fail |
Write a function called
printAllStudents()that prints all student records and use it on thestudentsarray.